
This part in the Dissecting XPS series will take off were we ended part 3, by looking into how the actual content is marked up.
The content is contained in the FixedPage element and it is marked up by three different elements
- the Path element which specified a geometry filled with a brush
- the Glyphs element which represents text
- the Canvas element which groups elements together
The Path element
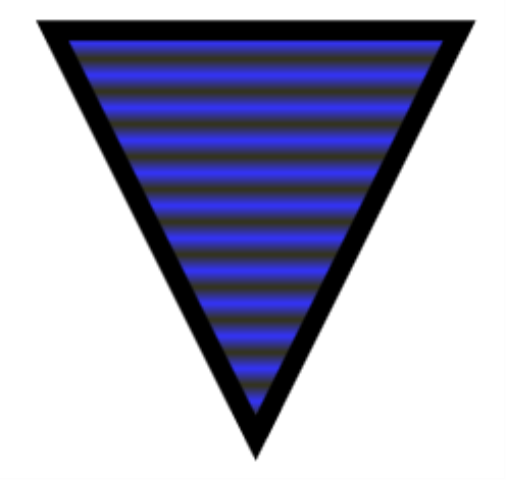 The Path element is used to specify a geometry shape and optionally fill it using a brush. This XPS markup code creates the triangle shown on the right.
1: Path Stroke="#000000" StrokeThickness="10">
2: Path.Fill>
3: LinearGradientBrush MappingMode="Absolute" StartPoint="0,0" EndPoint="0,8" SpreadMethod="Reflect">
4: LinearGradientBrush.GradientStops>
5: GradientStop Color="#333311" Offset="0.0" />
6: GradientStop Color="#3333FF" Offset="1.0" />
7: LinearGradientBrush.GradientStops>
8: LinearGradientBrush>
9: Path.Fill>
10: Path.Data>
11: PathGeometry>
12: PathFigure StartPoint="50,50" IsClosed="true">
13: PolyLineSegment Points="250,50 150,250" />
14: </PathFigure>
15: </PathGeometry>
16: Path.Data>
17: Path>
.csharpcode, .csharpcode pre { font-size: small; color: black; font-family: consolas, “Courier New”, courier, monospace; background-color: #ffffff; /*white-space: pre;*/ } .csharpcode pre { margin: 0em; overflow-x:visible;border:0px} .csharpcode .rem { color: #008000; } .csharpcode .kwrd { color: #0000ff; } .csharpcode .str { color: #006080; } .csharpcode .op { color: #0000c0; } .csharpcode .preproc { color: #cc6633; } .csharpcode .asp { background-color: #ffff00; } .csharpcode .html { color: #800000; } .csharpcode .attr { color: #ff0000; } .csharpcode .alt { background-color: #f4f4f4; width: 100%; margin: 0em; } .csharpcode .lnum { color: #606060; }
The Path element syntax contains several advanced features and allows you to create advanced vector graphics including lines, curves, arcs, beziers etc. Read more in the XPS Specification [1] or at Feng Yuans[5] blog (here an example of radial gradient brushes). If you are familiar with the XAML elements then this will be a piece of cake [6].
The Glyph element
 The Glyph element is used to draw text that has the same font and style. You specify the font, size and the location of the Unicode text to write:
1: Glyphs Fill="#000000" FontRenderingEmSize="48"
2: OriginX="100"
3: OriginY="100"
4: UnicodeString="Hello World!"
5: FontUri="../../../Resources/Fonts/arial.ttf" />
The sample above also requires that we have a Font part (the .TTF file), a relationship to the Font part in the FixedPage and that the TTF Content Type is present in the [Content_Types].xml file.
As the Path element the Glyph element is very powerful and allows you to do really advanced typing in any kind of written language. You may also apply any kind of brush to fill the glyphs.
The Canvas element
The Canvas element groups other elements (Paths, Glyphs or other Canvas elements) together to either group the elements into units or to apply properties to each child or ancestor of the unit, for example opacity.
By now you should be able to create your own XPS file using just Notepad and a ZIP program. Up next in the series is some more information on the XPS document properties.
Further reading and references
[1] XPS Specification[2] Dissecting XPS - part 1 - The basics[3] Dissecting XPS - part 2 - Inside the XPS document[4] Dissecting XPS - part 3 - the Fixed Document[5] The blog of Feng Yuan - master of XPS [6] WPF/XAML Graphics
Side note: Windows Vista uses XPS as it’s internal printer spooling.