Another post you think! Does this guy have a life? Well, actually I do. But once you get me started , I’m hard to stop…
This sixth post in the Visual guide to Azure Access Controls Services authentication with SharePoint 2010 is going to show you how to leverage some of the features that Azure ACS provides you with when using Facebook as Identity Provider. I’m going to show you how to use the Facebook Graph API and retrieve information about the user (and possible his/hers friends) - this is of interest if you’re going to build a community or something similar on top of SharePoint 2010. For instance we can use the information from Facebook and push into the SharePoint 2010 User Profile service once the user has signed up..
Sit back and relax, while I show you how to do this…
Add the Facebook AccessToken claim
First of all I assume that you have configured Facebook as one of the Identity Providers as detailed in part 3, secondly we’re going to use the approach with custom claims that we learnt in part 5. When you configured Facebook as an IP for your Relying Party Application and auto-generated Rules for the IP, then ACS automatically created some output claims for us. Especially the “http://www.facebook.com/claims/AccessToken" is of interest in this case.
This is a claim contains the access token required to do authenticated calls to the Facebook Graph API. And we will add this claim as in incoming claim to the Trusted Identity Provider in SharePoint 2010.
There is also another output claim that you should be aware of if building production code (which I’m not doing here) and that is the “http://schemas.xmlsoap.org/ws/2008/06/identity/claims/expiration" claim that contains the expiration time for the access token. You might need to check that so the user has to re-authenticate to get a new access token.
Ok, since Azure ACS has everything already in place for us, we only need to fix the Trusted Identity Provider in SharePoint. Just as in part 5 we’ll add the claim using this snippet of PowerShell.
$map = New-SPClaimTypeMapping -IncomingClaimType "http://www.facebook.com/claims/AccessToken" -IncomingClaimTypeDisplayName "AccessToken" -SameAsIncoming $tip = Get-SPTrustedIdentityTokenIssuer "Visual AuthN ACS" $tip.ClaimTypes.Add("http://www.facebook.com/claims/AccessToken") Add-SPClaimTypeMapping -Identity $map -TrustedIdentityTokenIssuer $tip $tip.Update()
Once this is done, just log out and in again using a Facebook account and we should see the new claim.
Now, we are all set to use this Access Token in some custom code. I know you’ve been waiting for some code in this series - it’s far too much clickety-click and PowerShelling…
Use the Facebook Graph API in a Web Part
To show you how to use the Facebook Graph API I’m building a simple Visual Web Part that is going to write the name of the Facebook user, the favorite quotes and show the profile picture. I’m not going into details on the Graph API here and there are a lot of .NET implementations/libraries that you can use, but for this demo this simple method is sufficient:
private Hashtable callGraphApi(Uri uri, string accessToken) {
    UriBuilder builder = new UriBuilder(uri);
    if (!string.IsNullOrEmpty(builder.Query)) {
        builder.Query += "&";
    }
    builder.Query += "access_token=" + accessToken;
    JavaScriptSerializer jsSerializer = new JavaScriptSerializer();

    using (WebClient client = new WebClient()) {
        string data = client.DownloadString(builder.ToString());
        return jsSerializer.Deserialize(data);
    }
}
This method takes a Graph API Url and the access token and returns a HashTable of the data. The implementation of the Visual Web Part is very simple, the Page_Load method is modified as follows:
protected void Page_Load(object sender, EventArgs e) {
    try {
        IClaimsPrincipal principal = Page.User as IClaimsPrincipal;
        IClaimsIdentity identity = principal.Identity as IClaimsIdentity;
        var accessToken = (from claim in identity.Claims
                            where claim.ClaimType == "http://www.facebook.com/claims/AccessToken"
                            select (string)claim.Value).FirstOrDefault();

        Hashtable me = callGraphApi(new Uri("https://graph.facebook.com/me"), accessToken);
        name.Text = me["name"].ToString();
        quote.Text = me["quotes"].ToString();
        image.ImageUrl = String.Format("http://graph.facebook.com/{0}/picture", me["id"].ToString());

    }
    catch (Exception ex) {
        error.Text = ex.ToString();
    }
}
First of all, I’m using a Linq snippet to get the access token and then I’ll do a call to the Graph API and retrieves data for the current user. The info is then just inserted into a few Label controls and an Image control. If you log in using a Facebook account and watch this Web Part it should look something like this:
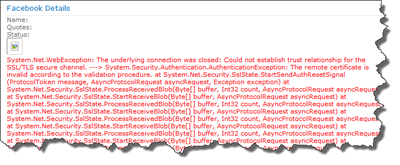
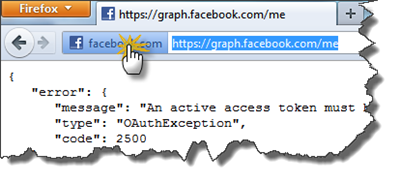
What! Why do I get this error! Wictor showed me everything!? Don’t be such a cry baby, remember that SharePoint keeps it’s own certificate store! And it does only trust certificates in that specific internal SharePoint store. So we need to grab the Facebook.com certificate and add that to SharePoint. To get the certificate I use Firefox (IE9 does not allow me to save the certificate!) and browse to https://graph.facebook.com/me. You’ll get an error but ignore that and click on the Facebook logo in front of the address, and then click on more information.
When the dialog appears, click on View Certificate and then finally on the Details tab use the Export button and save the certificate as a X.509 Certificate (PEM) file.
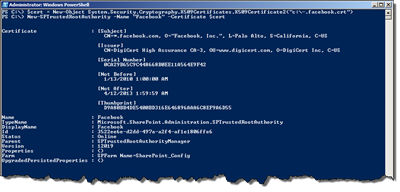
Copy this file to one of your SharePoint 2010 boxes and run the following PowerShell:
$cert = New-Object System.Security.Cryptography.X509Certificates.X509Certificate2("c:\-.facebook.crt") New-SPTrustedRootAuthority -Name "Facebook" -Certificate $cert
This will add the Facebook certificate to the SharePoint Certificate store and SharePoint will now trust Facebook! So reload the page with the Facebook Web Part again and voila…
Imagine what you can do with this. For instance on the first time log in - set the correct user name, upload the user profile picture etc etc. Now we’re talking!
More stuff…
If you need access to more information in the Graph API, such as statuses, friends etc you need to configure the permissions for the Facebook Identity Provider in Azure ACS. For instance if I would like to read out the status updates for a user I need to add the user_status permission to the Facebook Identity Provider in Azure ACS.
Then when the user re-authenticates it will be prompted by Facebook to allow these new permissions.
And now your application is allowed to read out status updates using the Graph API. You can find a list of all the available permissions here.
Tip: If you want to experiment with different Graph API Urls use the followin tool: http://developers.facebook.com/tools/explorer/?method=GET&path=me. You can copy and past your access token to the tool to see exactly what you can retrieve using that access token and your Facebook application permissions.
Summary
Now we’ve gone a long way from configuring Azure ACS and using simple Authentication using Google ID and Facebook to provide deeper integration with the external services. Good luck in building your own community sites!


