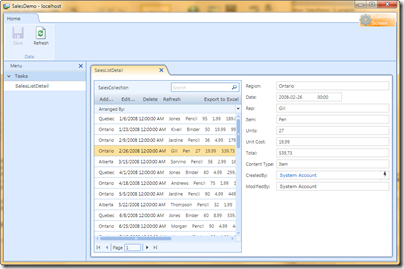
Visual Studio 2010 LightSwitch is a new kid on the block in the Visual Studio suburbs. Basically it is a rich client application editor for Visual Studio that allows you to develop (or should I say “click-through”) an application very easy without any programming skills at all. You can create a custom database, attach to an external data source or WCF RIA service and last but not least hook it up to SharePoint. And this is what I’m going to give you a quick peek at.
Install LightSwitch
First of all you need to install Visual Studio LightSwitch (I do not recommend to do it on your primary machine, as of now, since it is beta - I did it though). I failed a couple of times until I uninstalled the already existing pre-requisite WCF RIA Services and re-tried the LightSwitch installation.
Create a LightSwitch application
Once it is installed you are ready to create your first application. Start Visual Studio! LightSwitch installs as a project template in Visual Studio if you already have it installed. Select to create a LightSwitch project using one of your favorite languages; C# or Visual Basic. We’re going for C# here (even though we’re not going to write a single line of code…).
If you have been building SharePoint 2010 solutions previously using Visual Studio, your Framework dropdown is most certainly set to .NET Framework 3.5. Switch that to 4.0 to see the project templates for LightSwitch.
Connect to your data source
 Once your project is created by Visual Studio you have the option to create a new data source or connect to an existing. Since we will connect this application to SharePoint; select Attach to external database.
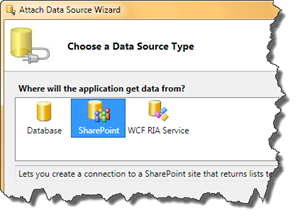
You will then be presented with a wizard where you can choose the type of data source you would like to connect to. You have the following options; Database, SharePoint and WCF RIA Service. We’ll go for SharePoint, of course!
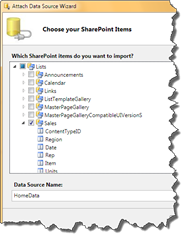 Next you have to provide the address to the SharePoint site you would like to connect to and how you are going to log in (current credentials or custom). After clicking Next (it’s a lot of next-next) you will see all the available lists in the SharePoint site you specified.
Choose the list or lists that you want to use in your LightSwitch application, as in the image to the right. When you are done click Finish to complete the wizard. If you have tables using lookups you will get a warning that says it will include these lists in your app as well. As the matter of fact you will always get this warning for SharePoint data sources since all lists contains created by and modified by which are connected to the user information list. Accept the warning by clicking Continue. Depending on how your lists are built you can get other warnings here as well, read the thoroughly and act accordingly.
When the wizard is finished you will see the designer of your application (see image below). You will see all the lists (tables) and the relationships between them. You can also configure the tables and relationships here. For instance you can configure validations and appearance.
If you need to add filters, sorting or parameters to the lists this is done by clicking on the Query toolbar button. Also if you want additional columns you can use the Computed Property toolbar button to add custom columns. You can then calculate these in your code behind for the app (but no code this time as I earlier said).
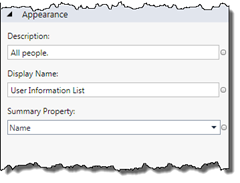
We will make a small change here and change the default property of the user information list. Double click on the UserInformationList entity in the designer and then select the entity and view the properties (F4). As you can see in the Appearance group, the default property is the ContentType column, duh!. Change that to Name instead.
Build the interface
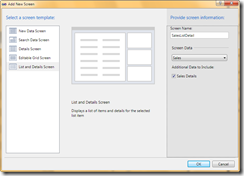 So now you have the data and you need some interface for this. It’s just as easy as clicking on Screen toolbar button. When this button is clicked you will see a dialog that allows you to choose from a set of pre-defined interface templates. In this case we select the List and Details Screen. Then in the Screen Data drop-down select the data source which should be the list (or one of the lists) that you choose in the wizard. Also check the checkboxes to include additional data and finally click OK.
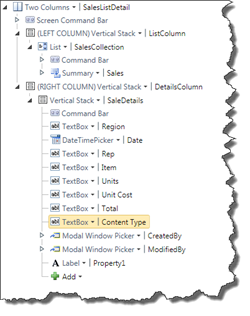
When Visual Studio has finished loading you will see a hierarchical view of the interface - very much like the control tree of a WPF application. Depending on which template that was previously selected the default control tree looks different. It is this control tree that controls the magic of LightSwitch.
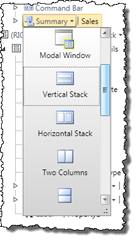 To customize the default experience a bit we’ll do a small change to the application. The selected data source only shows the Summary Property of the items (just as we changed for the user information list). To show all columns instead it is as easy as switching the Sales node of the left column from Summary to a horizontal stack. LightSwitch will then add controls in the tree for all the columns in the list. You can then of course remove those you don’t want in the list.
Take it for a test drive
I think we are good for a test drive now. Hit F5 and wait for your brand new application to start. Voila!
You can now easily browse the list and check out the details of each item. You can even edit the rows and persist the changes back to SharePoint.
Conclusion
So what’s the big deal here? LightSwitch allows you to very easy and fast create an application (using this even Todd Klindt can call himself a developer).
But. There is always a but..
Even though Microsoft is all in for LightSwitch, I have hard to see where it actually fits. It’s a little bit to “technical” to let this app loose amongst your business users and far to LightWeight for an advanced developer. We’ve seen how easy it is to do the same thing in Silverlight or WPF. Under the hood LightSwitch uses the SharePoint REST services (/_vti_bin/listdata.svc) so basically any other “data-wizard” in Visual Studio can do the same magic. It very much feels like a hybrid of Access and Visual Studio and I would have preferred to see this integrated to Access than into Visual Studio - that would (IMHO) be a far better experience for business users.
Then we have another problem with these kind of apps (just like Excel, Access etc) - if the users adopt this tool they will create another stack of data sources (if they don’t use SharePoint as data source and instead create new ones) that eventually becomes necessary for the business - which leads to that they must be backed up, migrated, integrated, you name it into SharePoint or other systems.
As of now I can’t see the business case for a professional developer to use this tool. But it’s ok - and for some it looks like magic…perhaps it might be used as a prototyping tool?!

