Welcome back to the SharePoint 2010 and Visio 2010 Better together series for this third part. In part 2 I showed you how to use Visio 2010 to convert your business requirements into workflows that later could be used in SharePoint 2010, using SharePoint Designer 2010 as the man in the middle. This time I’ll show you how Visio comes into play even after you have deployed your workflows and running them in your organization.
Workflows are a great feature in SharePoint 2010 that allows for instance your business rules to be performed in a consistent and repeatable manner. The SharePoint workflows are executed in the background of your web interface, they may pause for long durations and they may involve several users within your company. It can sometimes be hard to keep track of a long-running workflow and see what is happening right now, who is currently working on it etc. By default in SharePoint 2010 you have the Workflow History which is used to log events from the workflow. Events such as workflow status, errors and manual logging operations are seen there. This might be enough for a simple workflow. You can access the Workflow Information page, which contains the history, by clicking on the workflow status column in the list.
But for more complex workflows containing several branches and involving multiple users this history list can be long. To get a quick snapshot of the current workflow status it can be hard to interpret this list of log events. Wouldn’t it be better to have a visual overview of the workflow? For earlier versions of SharePoint this was available through third party products, but now in SharePoint 2010 this is actually available out of the box.
It is here Visio Services comes into play. Without digging into deep to the actual Visio Services Service Application, we’ll have plenty of time for that, let’s satisfy for the moment with that Visio Services is a server side Visio rendering engine. This feature is only available in SharePoint Server, since Visio Services is not available in SharePoint Foundation. If you have a successfully installed and configured the Visio Services Service Application in your SharePoint farm then all you have to do is open the workflow using SharePoint Designer 2010 and in the Settings section click the Show workflow visualization on status page checkbox. Don’t forget to save and publish your workflow. If Visio Services is not correctly configured for your Web Application then the checkbox will be disabled.
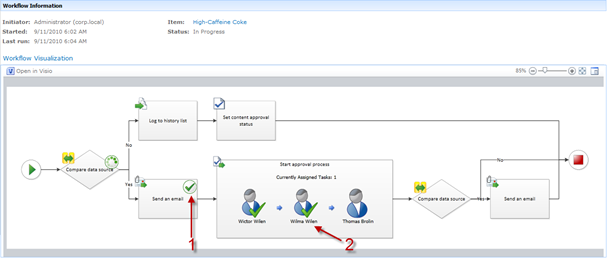
Once you have done this you can fire up a new instance of your workflow and then head on over to the Workflow Status page. You will now be presented with Workflow Visualization section on the status page containing the current status of your workflow presented visually using Visio Services. Take a look at the screenshot below, which is taken from the workflow that we used in the previous post. First you can see exactly which steps have been completed using the check box icon (1) and even better you can also see who is actually the current owner of the approval task (2). The screenshot shows that the original task has been reassigned twice. This is a perfect solution to get a hint on the workflow status within seconds.
This image is rendered by Visio Services using Microsoft Silverlight, which allows you to zoom and pan the workflow visualization. If you don’t have Silverlight installed then Visio Services will render a plain image instead. Using Silverlight is preferred though due to performance and quality of the visualization.
Worth noticing here is that the visualization does not to apply to already running instances of your Workflow, only new ones. When you publish the workflow from SharePoint Designer a new version of the workflow is created containing the visualization setting. Already running instances keep running the old version of the workflow.
As you can see from the screenshot some of the workflow arrows intersect and the layout is not optimal, also the labels on the actions are not that descriptive. For instance what does Compare data source actually do? Fortunately there is a really easy solution to this. Notice in the upper left corner of the Visio drawing that there is a Open in Visio button. Click it! In the dialog asking you which mode to open it, choose Edit and click OK.
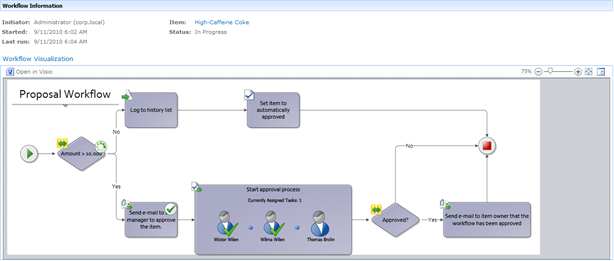
The workflow will open in Visio 2010 and you can design the workflow as you like and even apply the corporate branding. You can basically do anything but edit the actual workflow. I do recommend you to edit the labels of the actions and arrange the workflow so that no lines intersect. While you’re at it; do try the new auto-align features in Visio 2010 and the great container objects. When you are done all you have to do is save the drawing and then exit Visio.
The screenshot below shows a modified visualization of the previous workflow, it also has one of the built-in themes applied. I think this is pretty neat and for complex workflows I think this is a necessity.
Note: You cannot enable visualization for the Workflows that you have created using Visual Studio 2010, only for those created by SharePoint Designer.
That was it for this time. An introduction on how Visio Services can enhance your workflow experience even further. This really is a usability enhancement and your end-users will adore you for enabling it on your workflows. I will continue this excavation of SharePoint and Visio in the next part taking a closer look at the actual Visio Services Service Application.
This post was originally posted on EndUserSharePoint.com at http://www.endusersharepoint.com/2010/09/15/sharepoint-2010-and-visio-2010-better-together-part-3/


