Last week the Forefront team finally released Service Pack 3 for Forefront Unified Access Gateway (UAG) 2010. This is a long awaited release for us working with SharePoint 2013 and for those using non-legacy operating systems and browsers. In this post I will show you how to publish SharePoint 2013 Host Named Site Collections through UAG 2010 SP3 and consume the published site using Internet Explorer 10 on Windows 8.
What’s new in UAG 2010 Service Pack 3
Before diving into the interesting pieces let’s take a look at some of the new features of Service Pack 3. First of all, to be able to install SP3 you need to have your UAG at SP2 level – SP3 is NOT cumulative.
The most interesting features in SP3 are support for Windows 8, Windows Phone 8, Windows 8 RT and Internet Explorer 10 (classic and Metro) as client, support for the Office 2013 client and support for SharePoint 2013 as the published application. For SharePoint 2013 the URL Rule Sets has been modified to handle the new types of URL’s and request patterns used in SharePoint 2013, and new endpoint policies are added for SharePoint 2013. If you’re doing an 2010-2013 upgrade, you need to look over any custom URL Rules and policies. There’s also a number of improvements with regards to ADFS publishing.
Get all the nitty gritty details from the KB article: KB2744025.
Infrastructure
Ok, now you know what’s new! Let’s start publish our SharePoint 2013 sites through UAG. First of all before even installing UAG you need to think about your infrastructure, network, DNS and certificates (there it is again – certificates!). The picture below shows my demo environment. As you can see I have a UAG 2010 SP3 server with dual NIC’s (actually it have three – but we can safely ignore that). One NIC is connected to the Corporate Network and the other one to the External Network.
DNS
Before starting our publishing and SharePoint 2013 configuration we need to plan our DNS namespace. We need at least one publically available (that is a real) domain name. For this demo I will use three:
- trunk.corp.local – this will be used for my UAG Trunk Portal
- sp.corp.local – this will be a SharePoint 2013 site
- teams.sp.corp.local – this will be another SharePoint 2013 site
In order to make it efficient for the end-users I do prefer to have alignment of URL’s internally and externally. In this case it means that I have the second two domains above registered in the internal DNS as well. There is no need to register the Portal/Trunk domain internally.
Certificates
When publishing sensitive stuff such as SharePoint content you most likely would like to use HTTP over SSL, HTTPS, to encrypt the data flying throughout the internet. This is not only a good option to do externally, you should do it internally as well – even more now with SharePoint 2013 and the authorization flow over HTTP. Utilizing HTTPS internally also gives you the benefit of URL alignment for internal and external users and you don’t have to worry about sending an unreachable link. And we don’t have to do SSL termination.
 What you essentially need is one or two certificates – one from a trusted root authority to use on the UAG server and one for SharePoint, which can be a local CA issued certificate. You could use the same though. You should use wildcard certs or SAN certificates here – so in the end it comes down to manageability and costs of certificates.
In this sample I use one certificate, issued by my local CA. So any external clients, not joined to the domain will get a certification error (unless they have the CA root cert as a trusted root authority – which my external demo machine have). Specifically the Office clients have issues with not trusted certs.
The certificate is a SAN certificate covering sp.corp.local, trunk.corp.local and *.sp.corp.local. The certificate is installed on the SharePoint 2013 machine and on the UAG 2010 machine.
SharePoint with HTTPS
Before starting the UAG configuration let’s take a quick look at how the SharePoint 2013 farm is configured. In the SharePoint farm there is one Web Application using SSL on port 443. This Web Application is used to host Host Named Site Collections. This installation has two; sp.corp.local and teams.corp.local.
Install and update UAG 2010 to SP3
Installing Unified Access Gateway 2010 and patch it to Service Pack 3 is quite easy. But first of all – UAG 2010 SP3 does not support Windows Server 2012, so you have to dust off your old Windows Server 2008 R2 DVD’s and get used to that annoying Start button in the lower left corner.
Before inserting the DVD though, make sure that the OS is patched – yea, this machine should be a secure box and should have all the latest security hotfixes etc. Secondly make sure that you have the two required NIC’s wired in. Third – configure the NIC’s. If you’re uncertain on how to configure the NIC’s there is a good TechNet Wiki article called “Recommended Network Adapter Configuration for Forefront UAG” that is highly recommended as a starting point.
 Once all that is set, insert the DVD and follow the wizard to install UAG. If your DVD is a UAG SP1 you need to apply the following patches, in this order, to get up on Service Pack 3.
Once that is done a reboot is not out of order. Especially if you fiddled with the NIC’s and haven’t rebooted since.
Initial UAG configuration
Once you’re up on UAG Service Pack 3 it’s time to do the first time configuration of UAG. It’s a three step wizard that automatically starts when you fire up the UAG Management console the first time – and you can’t bypass it.
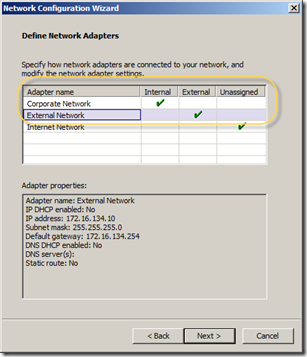
The first step is to connect UAG to your different NIC’s. As I said you need two of them – one for the internal network and one for the external network. In the Network Configuration Wizard (Step 1 in the UAG Getting Started Wizard) you have to choose which adapter to connect to the UAG Internal and External zone respectively. A good practice is to name your network adapters (in Windows) and give them describing names so they are not called just “Local Area Connection 1” and “Local Area Connection 2” – very easy to make stupid mistakes then…
The image below shows how I connected my “Corporate Network” NIC to the Internal UAG zone and the “External Network” to the External UAG zone. The machine have a third NIC – which I leave unassigned in this case.
Click Next when you’re done and finish the wizard. Step 2 in the Getting Started Wizard let’s you specify the UAG topology – leave it as as a single server and finish the wizard. Step 3 is the obligatory – do you want Windows Update and do you want to send usage data to Microsoft – I’ll leave it up to you to figure out the settings here.
Note: you can always get back to the Getting Started Wizard by choosing Admin > Getting Started in the UAG Management app.
Now all is set to start publishing some applications.
Creating a UAG Trunk
All applications in UAG are published in Trunks. A trunk consists of a portal and one or more applications. Each trunk have a set of shared settings between the different published applications – such as a public host name, certificate, URL Rules, endpoint policies, authentication and authorization settings etc.
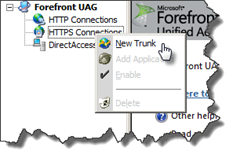
Since we would like to publish an HTTPS SharePoint 2013 application we start with creating a new Trunk under the “HTTPS Connections” node in the UAG Management App.
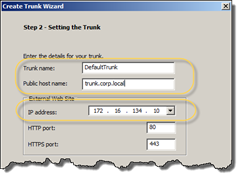
This will start yet another wizard (YAW). In Step 1 choose to create a Portal trunk. In Step 2 we need to specify the name, public host name and IP of the trunk.
Step 3 is used to configure how the end-user will authenticate. Click Add to select (at least) one Authentication Server. If you don’t have any servers in the server list you need to add one. You have a lot of options here – but in most cases you will add an Active Directory server and connect it to your forest. You also need a service account for this – that needs permissions to retrieve user information and change password.
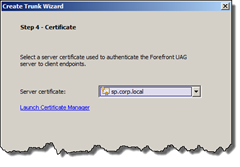
In Step 4 it’s time to select the external certificate. Hopefully you followed the instructions and have already registered the certificate on the UAG box. Choose the appropriate certificate and click next. If you’re like me and using a dummy domain (corp.local) you will get a warning here – it’s safe to ignore, we’re only writing a blog post.
The fifth step allows you to select what kind of endpoint protection you would like to use. Choose between UAG access policies or NAP. Choose UAG and continue to step 6, where you choose the endpoint policies – keep the default ones and continue. Then review your settings and click finish.
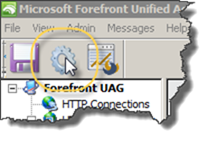
That’s it, you now have a trunk. All you now need to do is to save and then activate your new configuration. This is done through the cog wheel button in the management console.
You should now be able to test if you can access the trunk from a remote machine. The first time you access the trunk URL you will be asked to download and install the Forefront UAG client components. Depending on your configuration you will have limited access to your applications unless you install it. These components does a number of client security validations and they are also responsible for cleaning up your machine when you log out. Once logged in you should see an “empty” portal saying “No applications defined”.
If you don’t see anything like this or get errors here – it’s most likely related to certificates. Make sure that you have a correctly issued certificate registered with the Trunk. Also check the certificate chain and make sure that all the certs in the chain are trusted.
Add an application to the trunk
Now the time has come to publish our SharePoint 2013 Site Collection. In the Trunk you created under Applications click the Add button. YAW! In Step 1 you specify what kind of application you want to publish. You will find SharePoint 2013 under Web – it’s called “Microsoft Office(!) SharePoint Server 2013”.
Click next, give the application a name. In Step 3 leave all the endpoint policies as-is – you could easily spend a day fiddling with these if you have the time or need. In the fourth step choose to publish an Application Server. You should choose this if you have one server or a SharePoint farm behind some kind of load balancer. Step 5 is where you configure the actual SharePoint 2013 application. Add the name of your internal SharePoint 2013 site and specify the public host name. In my case my SharePoint 2013 site is published using HTTPS internally so I need to specify HTTPS/443 here – no SSL Termination.
Step 6 – Authentication. Choose an authentication server (use the same as you created and used for the Trunk). Here you also specify how rich clients authenticate with your application – in my case I choose to use both Rich Client integration and a Office Forms Based AuthN.
In the seventh step you configure how the application appears in the portal and in the eight and last step you can configure which users actually have access to your application, but just leave the default settings for now – that is everyone who can log in can also access the application (note, that this doesn’t mean they bypass any security in SharePoint).
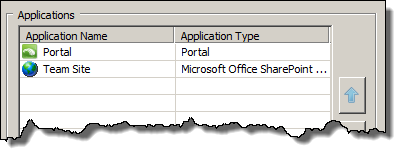
Once you’re done with the wizard you should have two applications listed in your trunk – the portal and your newly added SharePoint site:
Now save and activate your new configuration.
Take it for a test-drive…
Close down your browsers, if you did test to log in to the Trunk earlier, and browse to the public portal URL once again. If you don’t see your application – log out of the portal and log in again.
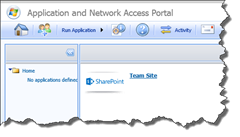
You should see something like this:
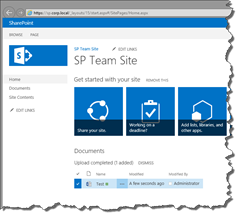
Now, click on the application link and see how beautifully your SharePoint 2013 site is published through UAG. Test how you can drag and drop documents, open them in Office clients, edit lists in Quick Edit mode and work just perfectly!
Publishing the second SharePoint 2013 Site Collection is exactly the same – you add a new Application to the trunk and follow the wizard.
Summary
In this post I showed you how to install, patch and configure Forefront Unified Access Gateway (UAG) 2010 Service Pack 3 to be able to publish SharePoint 2013 Web Applications and Site Collections. It’s a pretty straightforward approach but involves some crucial steps. If you previously published SharePoint 2010 applications using UAG you noticed that there is no difference with regards to setting it up. The difference are in the details, specifically in the URL rules applied and a new set of policies.


