In my last post (still smoking fresh) I showed you how to update your Office Web Apps 2013 farm to the March 2013 update, connect it to SharePoint 2013 and being able to view PDF documents in the browser. What I didn’t explain or show in that post was how to enable the PDF Previews in Search – but I’ll do it now.
Pre-requisites
Before you start fiddling with this, you need to make sure that you have the March 2013 update of Office Web Apps Server 2013 (WAC) installed and connected to your farm – if you don’t know for sure, ask your admins – sometimes they know…if they don’t give them the link to my previous blog post.
Note: You don’t have to have a patched SharePoint 2013, this will work on the RTM bits.
Default PDF Search Experience
SharePoint 2013 natively supports crawling PDF documents, through the new document parsers. That is you don’t have to fiddle with any custom PDF IFilters etc. The native PDF document parser is a good enough solution, but have some room for improvements.
The Search Experience and display in SharePoint 2013 is based upon Display Templates. Display Templates decide how the result should be shown and how the fly-out of the result should look like. For Office documents, when SharePoint 2013 is connected to a WAC farm, SharePoint displays inline previews which you can use to skim through the results really quick. For PDF this is not the case – not even if you use a WAC farm with the March 2013 update (even though the WOPI binding supports the interactivepreview action). This is a sample on how a PDF document could look like in SharePoint 2013 Search:
Enabling PDF Previews in the Search Result
Since we have the opportunity to modify the Display Templates and create our own Search Experience we can very easy modify the fly-out/hover panel of the PDF results to show the interactive preview. We can do this in two different ways…
Create a new Result Type
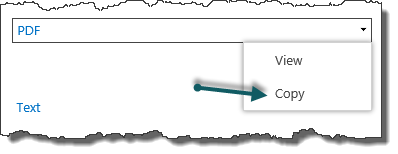
The easiest and fastest approach to enable our previews for PDF documents is by creating a custom Result Type. This is done by going to Site Settings > (Search) Result Types and then finding the PDF Result Type. Choose to Copy the Word Result Type. This will create a new Result Type.
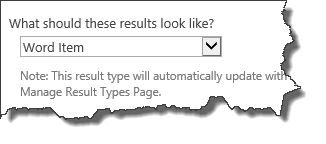
Give the new Result Type an appropriate name, “PDF with Preview” for instance. Then scroll down to Actions and in the “What should these results look like?” drop-down, choose to use the Word Display Template.
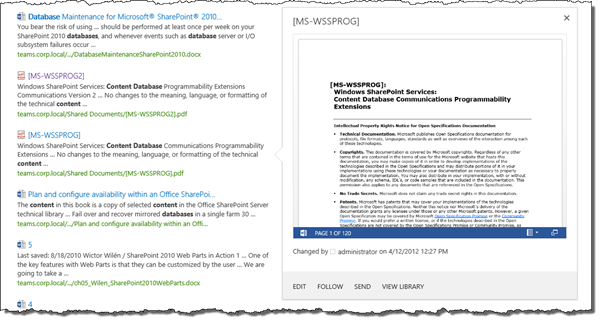
Then just click Save, go back to your Search Center and search for a PDF document and voilá – we have PDF Previews.
Modifying the PDF Display Templates
The second approach, which is a bit more advanced is to actually modify the PDF Flyout Design Template. You do this by going to Site Settings > Design Manager then choose 5. Edit Display Templates. Locate the PDF Flyout item by filtering on the Target Control Type column and use SearchHoverPanel, then scroll down to PDF Hover Panel. To modify the PDF Hover Panel, use the Word Hover Panel as a template. I’m not going in to all the details on how to modify the actual HTML file (see my similar post on how to achieve this here). But once you’ve modified it, make sure to save it to the gallery so the JS file is generated, and publish it. Now (if you made the correct updates) you will have Custom Search Previews for PDF documents.
Summary
You’ve now seen how you quick and easy can enable PDF Search Previews in SharePoint 2013 using the March 2013 update for Office Web Apps 2013. All you need to do is either create a custom Result Type and use the Word Display Templates or modify the default PDF Display Template. I really hope that Microsoft makes this a standard feature for upcoming SharePoint 2013 releases.


