This is a the second part of the Visual guide to Azure Access Control Services authentication with SharePoint 2010. I hope you’ve read part 1 which showed you how to configure SharePoint 2010 to use Windows Azure Access Control Services, ACS, as the federated Identity Provider, IP. In this post I’ll go through the most common errors that you might stumble upon (most likely due to the fact that you didn’t follow part 1 thoroughly). These errors are also applicable to other providers such as ADFS.
Note: this post is written using Azure ACS as per February 2012 and with SharePoint 2010 Server with SP1 and December 2011 Cumulative Update.
So let’s get started with a very annoying problem - Live ID…
Windows Live ID and the e-mail claim
The first error is not an error per see. You will see this one if you followed the instructions in the first part - but instead tried to use Windows Live ID when logging in. What you will see is the classic “An unexpected error occurred”.
The key here is to take a look at the URL. You will see a query string parameter called errorCode which has the value TrustedMissingIdentityClaimSource.
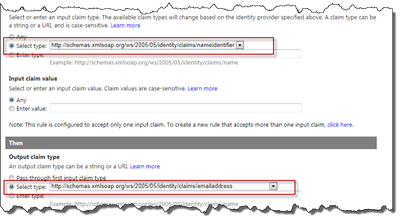
So there is something missing! To understand what happened here we need to get back to the ACS management portal and take a look at the Rule Group that was created for our Relying Party Application. As you can see in the image below only one claim is augmented when using Windows Live ID - the nameidentifier. In part 1 we configured the identity claim (in the PowerShell script) and we configured it to use the e-mail as identity claim (http://schemas.xmlsoap.org/ws/2005/05/identity/claims/emailaddress). If you read the last series on Live ID AuthN with SharePoint 2010 you might remember that you could not use the e-mail address of the Live ID user but instead had to use the UUID (basically a GUID that uniquely identified the user). Unfortunately (and this is a real bummer) this UUID (claim type http://schemas.xmlsoap.org/claims/UPN) is not available in Azure ACS, for Live ID. Instead the only claim we have access to is the nameidentifier - which is a unique identifier for the specific user on this ACS namespace.
If we add a new Rule in Azure ACS that uses the nameidentifier as input claim and outputs it as the emailaddress identifier claim. Then we at least have something unique for the user to work with.
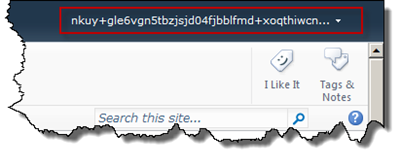
When you now log in using a Live ID you will get an access denied message, which displays this unique nameidentifier. Copy the identifier and then log in using a Windows account (or the working Google account) and this identifier to the Members group (for instance).
Then log in again it will work, but…
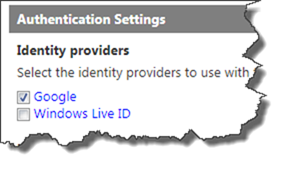
Looks pretty bad! So you better leave Windows Live ID out of the discussion (until Microsoft fixes ACS to give us a decent claim to work with). Edit the Relying Party Application in ACS and remove Windows Live ID as Identity Provider and you will be a much happier person.
No Rules applied here!
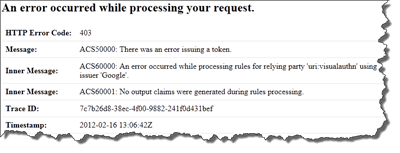
One problem you might see when setting up the authentication using ACS is that you might be to trigger happy and fast when configuring and just forgets to add any Rules to your Relying Party. When you’re trying to log in you will see an error message like this:
The error message is ACS50000: There was an error issuing a token, with two inner messages ACS60000 and ACS60001 where the last one gives us the clue in plain text: “No output claims were generated during rules processing”. This is just because you have no rules applied to that Relying Party which converts the incoming claims from the IP’s to outgoing claims. To fix it edit your Rule Group and just use the Generate to create your output claims:
This might happen if you’re adding more Identity Providers to your Relying Party once you have configured it.
Note: make sure that you’re doing it for the correct Rule Group - the one selected in the Relying Party.
Invalid identifier claim
Another error, not that common though, that might happen if you start fiddling with the claims is that you do not get any incoming identifier claim to SharePoint. When this error happens you will get the classic An unexpected error has occurred error page.
The actual error can be find either in the URL or in the trace logs - both explain exactly what has happened. In the URL the error code is written out as TrustedMissingIdentityClaimSource. Exactly the same as in the Windows Live ID dilemma above.
And in the trace logs you will find several entries (depending on your log level):
To fix this make sure that you have an output claim, from the ACS Relying Party, for each Identity Provider, that matches the exact claim that you specified when configuring the token issuer identity claim (using PowerShell). You can verify your identity claims by running the PowerShell snippet
Get-SPTrustedIdentityTokenIssuer | ft Name, @{Label = "Id Claim"; ` Expression={$_.IdentityClaimTypeInformation.InputClaimType}} -autosize
Then check you ACS rules and that each IP has an output claim of that type (that is unique of course!).
Token lifetime
The most common problem with Azure ACS and SharePoint 2010 is that you successfully logs in and then either directly are redirected back to the log in page or you’re logged in for a second and then as soon as you click something are requested to log in again. If you have enabled Verbose Trace Logging for Claims Authentication (which definitely is a good thing to do when troubleshooting claims stuff) you will also see this message in the ULS logs: “Token cache entry missing.”.
This is most likely due to that you have misconfigured the Token Lifetime, or just let it have the standard value of 600. Most likely you did not read my previous post thoroughly enough!!!
The STS of SharePoint 2010 has a default lifetime of the logon token set to 10 minutes (600 seconds) and this is also the default value of the ACS RP token lifetime (600 seconds). If you with these default values can actually log in you have a fast connection/machine, but any subsequent action in SharePoint will force you to re-authenticate. You have to configure the lifetime in ACS larger than the value in SharePoint (either by increasing the ACS token lifetime or lowering the SharePoint 2010 LogonTokenCacheExpirationWindow value of the STS.
In my previous post I set the token lifetime to 700 seconds - this will then make your users log in every 100 seconds (700-600). If you set it to 610 seconds in ACS you will have to re-authenticate every 10 seconds. A recommendation is to bump it up to 3.600 seconds, so you don’t annoy your users to much!
Not using correct SAML version
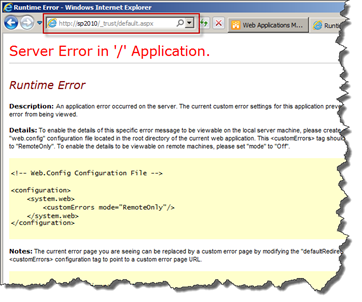
Another common error is that you get a Runtime Error (Yellow Screen of Death) directly after you have logged in using one of the IP’s. The ULS logs does not show any useful information, you just see that a request is going to the /_trust/default.aspx page.
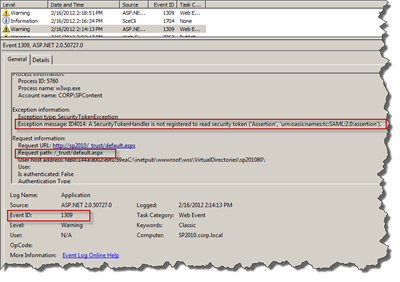
On the other hand, if you switch to the Windows Event Viewer you will notice an ASP.NET error, with event id 1309. And if you look closer at the details, the answer is there, once again under your fingertips.
The exception message says: “ID4014: A SecurityTokenHandler is not registered to read security token (‘Assertion’, ‘urn:oasis:names:tc:SAML:2.0:assertion’).”. Once again you’ve misconfigured the ACS Relying Party - you must use SAML 1.1 to get this working (without setting up an intermediate ADFS server or similar).
Certificate problems
Another issue that might throw the yellow screen of death on the /_trust/default.aspx page is when you have invalid or missing certificates. Again both the trace logs and Windows event logs shows us the error. In the Windows Event Logs you will see a SharePoint error with event id 8311. This error will say that it could not validate the certificate used to sign the incoming claims. The trace logs will show the exact same error, also with id 8311, in the Topology category.
Fix the error by making sure that you have added the same signing certificate to Azure ACS and as a trusted root authority. See part 1 of this series for more info.
Summary
As you can see it’s all about configuration and make it right! I hope this post will help you with the basic problems, and if you get any other errors, please post a comment.
I’ll be back with at least one more post on this topic…


