
ngrok is a fantastic tool, that I use on an everyday basis when building solutions cloud. It allows me to host and debug an application locally and at the same time host the website or API’s with a publicly accessible https endpoint. As I work quite a bit with Microsoft Teams development this is essential when building bots (Azure Bot Service cannot talk to localhost) or building out Teams Tabs with SSO. However, how good this tool might be, there are several firewalls, security clients and companies that actively block ngrok. Ngrok does establish a tunnel from the public internet to your machine, and you should be aware of that - it is a security risk. Most notably ngrok has been used as tools for malicious attacks.
There are plenty of alternatives out there, a few open source ones - most I’ve tried are very unreliable and you have no idea where your data ends up, and some are only good for single user scenarios (most SSH based ones). But none as good as ngrok. But in my case we do have a situation where ngrok can’t be used, due to some of the above restrictions. I also tried setting something up with Azure Service Bus - it works great for a single developer with one or two named endpoints, but it’s not as flexible as I need it. I needed to find an alternative solution that would allow static publicly known and available endpoints and minimal maintenance.
Using nginx and SSH to create a secure and persistent tunnel
Together with our security folks we decided that using NGINX and SSH would create an acceptable solution for this. NGINX allows for great flexibility and it also very lightweight. The idea was to setup an NGINX server in Azure, hosted on a Linux virtual machine, with a public IP and known domain name. Then, with the help of SSH the developers/users would establish a remote session to set up the tunnel. It turned out to be very reliable and stable, cost efficient and essentially zero maintenance.
And I’ll share the setup of this, and at the same time have this documented for future needs.
How to set it up
The setup requires that you have an Azure subscription and that you buy a domain. The total cost will be about $5-10 a month for the Azure resources and a few dollars for your domain. All in all - way cheaper than if you have a handful of developers requiring ngrok.
Preparing Microsoft Azure and create a virtual machine
In Azure, create a new Resource Group and then add a new virtual machine for that resource group. I used the following VM setup, adjust after your needs:
- Ubuntu Server 16.04 LTS
- Standard B1
- Administrator account and password
Take a note of the public IP, you will need it later.
You also need to go into Networking and add an Inbound port rule to allow HTTPS. Select port 443 and protocol TCP. You can make your solution more secure by adding a specific source.
Installing NGINX
Use SSH to log in to your machine, using the administrator account you specified above and the public IP of your virtual machine.
ssh administratorname@111.111.111.111
Once logged in you need to install NGINX as follows:
sudo apt update
sudo apt install nginx
After that I recommend that you enable the firewall (ufw) and only allow Nginx HTTPS and SSH.
sudo ufw allow 'OpenSSH'
sudo ufw allow 'Nginx HTTPS'
sudo ufw enable
Configuring the DNS for your domain
Before we proceed with configuring Nginx, we need to have a domain. My favorite place for this is GoDaddy, but you can use whatever you want. Once you have a new domain, or reuse one you already have, add a new A record that has a wildcard value pointing to the IP of your virtual machine. I also recommend that you add an entry without wildcard for your domain - it will be easier for your SSH setup later.
A    *    111.111.111.111    1 hour
A    @    111.111.111.111    1 hour
An easy way to validate your setup is to exit your SSH session, and open up a new one but this time instead of using the IP use a random name for your domain. Assuming you set up the wildcard A record for the domain *.contosoproxy.com then you can use test.contosoproxy.com.
Set up a certificate
In order to use HTTPS for our proxy we will use Let’s encrypt.
The following commands will install the certbot and the Nginx plugin for it:
sudo add-apt-repository ppa:certbot/certbot
sudo apt update
sudo apt install python3-certbot-nginx
Once we have that installed we need to configure and request our certificate using the command below. Make sure that you follow the instructions carefully.
sudo certbot certonly -d *.contosoproxy.com --manual --preferred-challenges=dns
You will then get asked to create a TXT record in your DNS file - do that and then press enter . Make sure you specify the exact values! Also, I’d recommend you set a short TTL on the record as well as wait a minute after you done the addition in your DNS system before you hit enter to proceed.
If all goes well you should recieve a Congratulations message and the location of your certificate, chain and key file.
Take a note of the certificate expiration time so you can renew it when needed. You know what happens to people who don’t renew their certificates!
Configuring NGINX
Next up is configuring Nginx for our domain. It’s easy to do using the built-in nano editor. First of all you need to create a configuration file in the Nginx sites-available folder and it should have the name of your domain:
sudo nano /etc/nginx/sites-available/contosoproxy.com
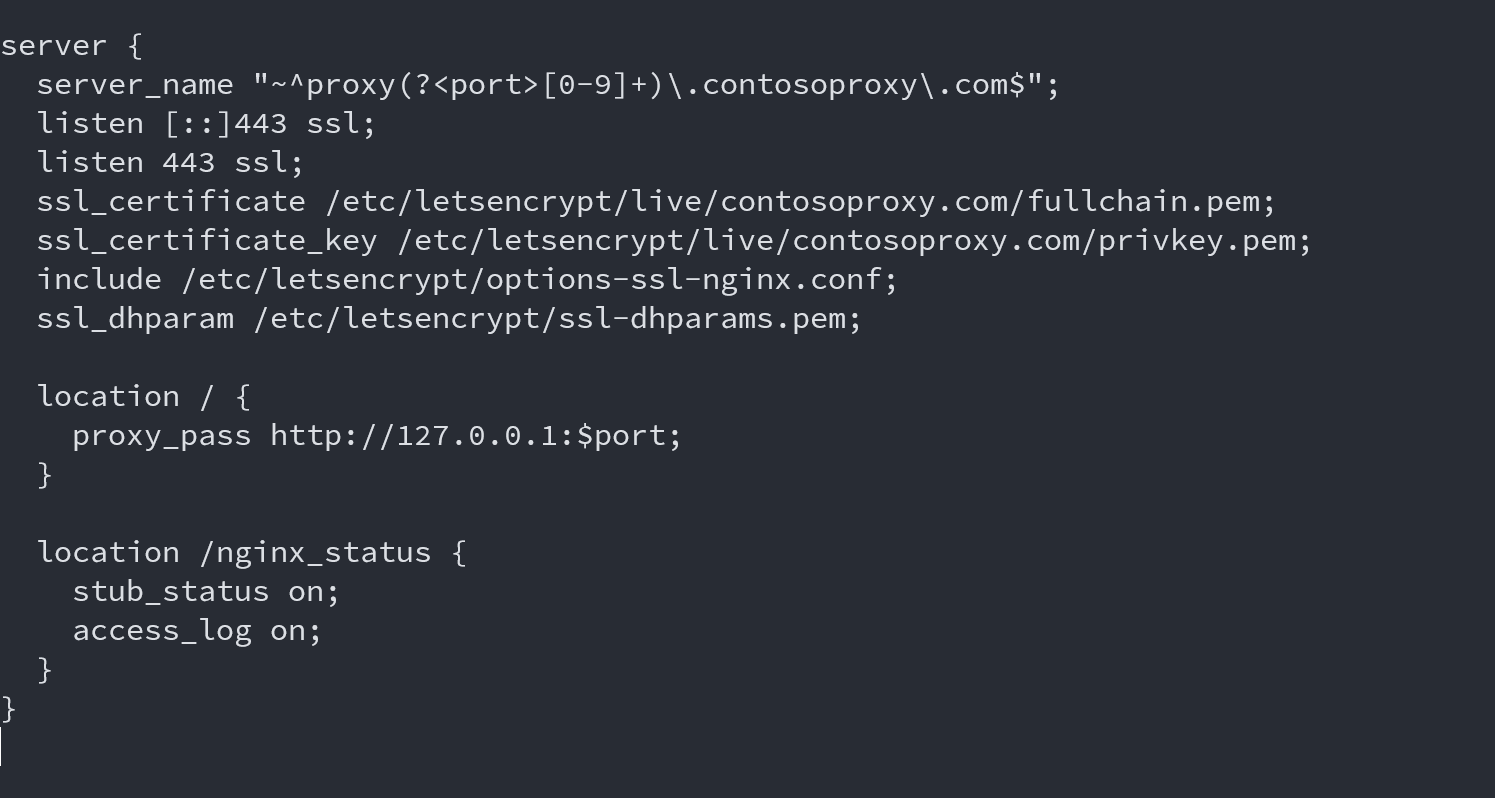
The file should have the content as below. Yes, it’s a few things in there. First of all we define two servers/listeners. One default and one who listens to anything with the following format proxy*[number]*.contosoproxy.com. That is we can randomly assigns a public URL such as proxy40123.contosoproxy.com. The number represents the port we’re using. I’d recommend always using high ports so it don’t start colliding with well-known ports.
Someone with more Nginx skills might want to jump in here and create a listener that listens to only ports between 30.000 and 50.000 for instance.
The things you need to modify is:
- your domain name
- the path to the certificates (as provided by
certbotabove) - any prefix you want instead of proxy
# Nginx configuration file:
# /etc/nginx/sites-available/contosoproxy.com

server {
  server_name _;
  listen [::]443 ssl;
  listen 443 ssl;
  ssl_certificate /etc/letsencrypt/live/contosoproxy.com/fullchain.pem;
  ssl_certificate_key /etc/letsencrypt/live/contosoproxy.com/privkey.pem;
  include /etc/letsencrypt/options-ssl-nginx.conf;
  ssl_dhparam /etc/letsencrypt/ssl-dhparams.pem;

  location / {
    proxy_pass http://127.0.0.1:30000;
  }

  location /nginx_status {
    stub_status on;
    access_log on;
  }
}

server {
  server_name "~^proxy(?<port>[0-9]+)\.contosoproxy\.com$";
  listen [::]443 ssl;
  listen 443 ssl;
  ssl_certificate /etc/letsencrypt/live/contosoproxy.com/fullchain.pem;
  ssl_certificate_key /etc/letsencrypt/live/contosoproxy.com/privkey.pem;
  include /etc/letsencrypt/options-ssl-nginx.conf;
  ssl_dhparam /etc/letsencrypt/ssl-dhparams.pem;

  location / {
    proxy_pass http://127.0.0.1:$port;
  }

  location /nginx_status {
    stub_status on;
    access_log on;
  }
}
Exit the nano editor by Ctrl-X, Y followed by Enter.
Next you need to do is to make a symlink from this configuration file to the Nginx enabled sites directory.
cd /etc/nginx/sites-enabled
sudo ln -s ../sites-available/contosoproxy.com
Nginx has a default site configured, go in and disable the listeners for that one by typing:
sudo nano /etc/nginx/sites-available/default
And then comment out the following two lines, directly listed under the first server:
#       listen 80 default_server;
#       listen [::]:80 default_server;
And to get things up and running we just need to restart Nginx:
sudo nginx -s reload
The configuration above also includes the Nginx status page, so you can verify that your solution by opening up a browser and type in your domain: https://contosoproxy.com/nginx_status or https://proxy30100.contosoproxy.com/nginx_status. The first one will give you a certificate warning as we only created a certificate for the wildcard domain.
Establish the session
To establish the session all you need to do is on your local machine open up a terminal and type the following:
ssh -N -T -R 30100:localhost:3007 adminaccountname@contosoproxy.com
30100is your random port - and in multi user scenarios each developer or user uses it’s own random onelocalhostis the localhost3007in this case is my local port, where I have my local web serveradminacountnameis the name to use when logging in with SSH@contosoproxy.comcorresponds to my domain (remember I created that extra A record)
If you have multiple users, create dedicated users for them using
sudo adduser username
Test with a locally hosted web server
To test this it’s very easy, just create a simple web server locally and run it. Here’s a quick test server that you just save as a .js file and then run with node server.js:
var http = require('http');

http.createServer(function (req, res) {
  res.writeHead(200, {'Content-Type': 'text/plain'});
  res.end("Hello world");
}).listen(3007);
If all goes well you should now when browsing to your site see the text Hello world - and you have your own proxy solution for development teams.
Summary
Even though it was quite a few commands to run in this exercise this should not take more than 15-20 minutes to have up and running. It’s great way for you and your team to be able to host and debug websites and API’s on your local machine and still have them accessible by public internet services. All this for just a few bucks a month. It’s no way near in terms of features compared to ngrok, but it works pretty good.
I just wish Microsoft took their Service Bus infrastructure and made it into a simple developer tool where you could get a similar experience, but more secure and with less maintenance.