

The growth of using Yo Teams - the Microsoft Teams Apps generator - has been tremendous over the last year, and I can really tell that it’s not just being used for development and testing by the number of questions and requests I get on how to make a proper deployment of the solution to Azure. In this post I will share how I most often do it.
The initial version of Yo Teams shipped with simple instructions on how to do Git deploy of your application to Azure. A method that worked most often, but was very error prone and very slow. This is still in the documentation of any generated project (yes, will change in 2.17 and later). That method was never intended for any production scenarios, but more as a quick start for developers to get going. But now, with Azure DevOps pipelines being available to almost everyone, and with Github Actions, I think it is about time to document this down so I have something to share when this question comes up.
Getting started
The following instructions assumes that you scaffolded a project using the Yo Teams generator and that you are using Azure DevOps to do the heavy lifting. The steps are very similar with Github Actions - and if I get some requests/comments I’ll do a follow-up post on that specifically. We also assume that your target is an Azure Web App, but again it’s very easy to change the workflow if you want to deploy it to a container registry.
Prepare Azure
To host our Teams application in Azure we need an Azure Web Application. This Web Application should be configured to use Code deployment to the Node 12 LTS runtime stack.
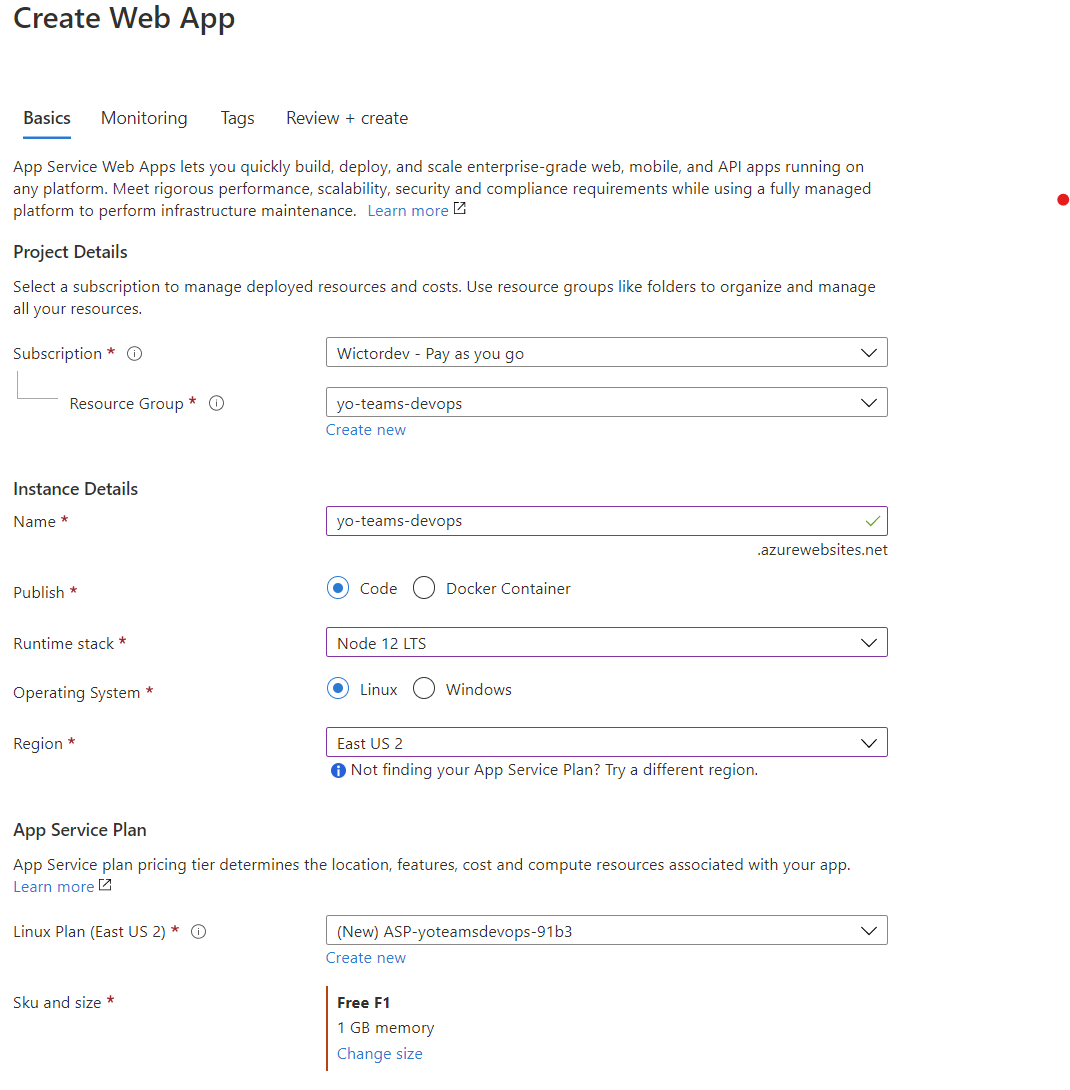
NOTE: By default an Azure Web App get the DNS name of
.azurewebsites.netand if you have a tab requiring Single-Sign-On this is not currently supported. In that case you either have to configure a custom DNS name and certificate to your web app or use Azure Front Door in front of your web application (to get an.azurefd.netdomain instead).
Azure DevOps setup
Since we’re using Azure DevOps for our deployment we also need to push our code to an Azure DevOps repository. Just commit your code and push to the repository for the project.
Create the pipeline for build
Now it’s time to start building the Azure DevOps pipeline that we will use to build the application. In you preferred text editor you create a new file in the root of your project called azure-pipelines.yaml.
The first thing we should do is to define a set of variables to be used. For Yo Teams generated project some variables are required during build time to be included in JavaScripts and HTML pages. It might the Application Insights key, Tab SSO Id’s etc. They should be entered here. Runtime variables, used by server side code should be configured on the Azure Web App.
variables:
  APPLICATION_ID: 00000000-0000-0000-0000-000000000000
  APPINSIGHTS_INSTRUMENTATIONKEY: 00000000-0000-0000-0000-000000000000
NOTE if you decide to also package your manifest file using the pipeline, the replaceable variables for the manifest file should also be listed as variables here.
You can also configure these variables using the Azure DevOps pipeline variables feature, which makes it easy for you if you have different variable sets for different environments.
Then we need to define what to trigger on, for this post let’s just trigger on the main branch.
trigger:
  - main
After this it’s time to start the fun part. I prefer to use stages in my pipelines, but this demo only uses one stage called Build, as you can see below. In this stage we have a set of jobs that in order do the following things:
- Install and use Node 12.x on our build VM
- Run a script to download the node-prune tool
- run
npm installto install our node modules - run
npm buildto build the solution, using the environments variables specified above - run
npm prune --productionto remove unnecessary node modules that is not required when running the application. For instancewebpack,gulpand other tools required during the build is removed - run the node-prune tools to further slim down the footprint of the application
- copy only the needed files to run the application to a temporary location
- archive the files into a
zipfile - publish our
zipfile so we can pick it up in the release pipeline
stages:
  - stage: Build
    displayName: Build and package
    jobs:
      - job: Build
        displayName: Build and package
        pool:
          vmImage: "ubuntu-latest"
        steps:
          - task: NodeTool@0
            displayName: Use Node 12.x
            inputs:
              versionSpec: "12.x"
          - script: |
              sudo curl -sfL https://install.goreleaser.com/github.com/tj/node-prune.sh | sudo bash -s -- -b /usr/local/bin
            displayName: Install node-prune
          - script: |
              npm install
            displayName: npm install
          - script: |
              npm run build
            displayName: npm run build
          - script: |
              npm prune --production
            displayName: npm prune
          - script: |
              /usr/local/bin/node-prune
            displayName: execute node-prune
          - task: CopyFiles@2
            displayName: Only publish files needed for runtime
            inputs:
              SourceFolder: "$(System.DefaultWorkingDirectory)"
              Contents: |
                dist/**
                library/**
                package.json
                node_modules/**
              TargetFolder: "$(Build.ArtifactStagingDirectory)"
          - task: ArchiveFiles@2
            inputs:
              rootFolderOrFile: "$(Build.ArtifactStagingDirectory)"
              includeRootFolder: false
              archiveFile: "$(Build.ArtifactStagingDirectory)/$(appName).zip"
              archiveType: zip
          - task: PublishPipelineArtifact@1
            inputs:
              targetPath: "$(Build.ArtifactStagingDirectory)/$(appName).zip"
You can of course add support for running tests and publishing the results of those into this by adding the following steps after the npm install step:
- script: |
    npm run test
  displayName: Running tests
  continueOnError: "true"
- task: PublishTestResults@2
  condition: succeededOrFailed()
  inputs:
    testResultsFormat: 'JUnit'
    testResultsFiles: 'junit.xml'
    mergeTestResults: true
    failTaskOnFailedTests: true
- task: PublishCodeCoverageResults@1
  inputs:
    codeCoverageTool: Cobertura
    summaryFileLocation: $(System.DefaultWorkingDirectory)/coverage/cobertura-coverage.xml
Once you’ve committed this new file and pushed it to your repository, follow these steps to setup the build pipeline:
- Got to Pipelines and then select Create Pipeline
- Choose to use Azure Repos Git and select your repository
- When asked for a template choose the Select Existing Azure Pipelines YAML file and select the
azure-pipelines.yamlfile in your repository
When this is done, you can test the pipeline by clicking on Run, to verify that it builds correctly.
Create the Release Pipeline
Now your Teams application will be built on each commit to the main branch. To setup the deployment to our Azure Web App go to Pipelines > Releases in Azure DevOps and click onc New pipeline. You can choose to start with one of the templates or choose Empty job, which we will do for this setup.
On the left hand side click on Add an artifact and choose to use the Build output from your newly created build pipeline and click Add.
In Stages, click on the 1 job, 0 task link to edit the tasks for that stage. Under Agent job click on the + to add a new task and choose to add an Azure Web App task and follow the instructions. First you need to choose an Azure subscription and Authorize DevOps to read and deploy to it. Secondly you need to choose Web App on Linux as the App type. In the App name drop down choose the Azure Web App that initially was created and then for runtime stack choose 12 LTS and as the startup command type in the command below. This last step is crucial for your app to start.
node dist/server.js
Click Save when you are done and then go back to the Pipeline view and click on the lightning icon on your artifact. In here we can configure how releases are created. Enable the Continouse deployment trigger to get a new release when your build pipeline succeeds. To manually create a release, we can click on Create a release in the upper right corner.
Time to take it for a test drive
In your application, make a new change, commit the source code and push it to your Azure DevOps repository. Once you’ve done this you can go to Azure DevOps and to Pipelines > Pipelines to see that your build has automatically kicked off
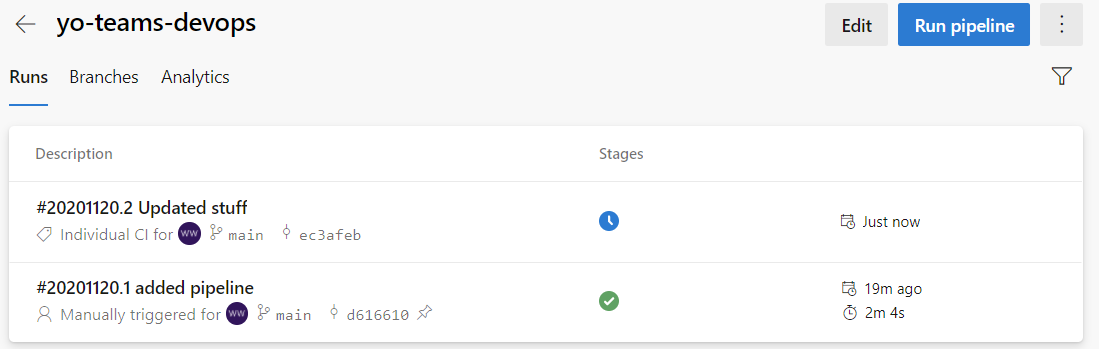
Once this is green you can go to Pipelines > Releases and you should see that your Release pipeline is now deploying your app.
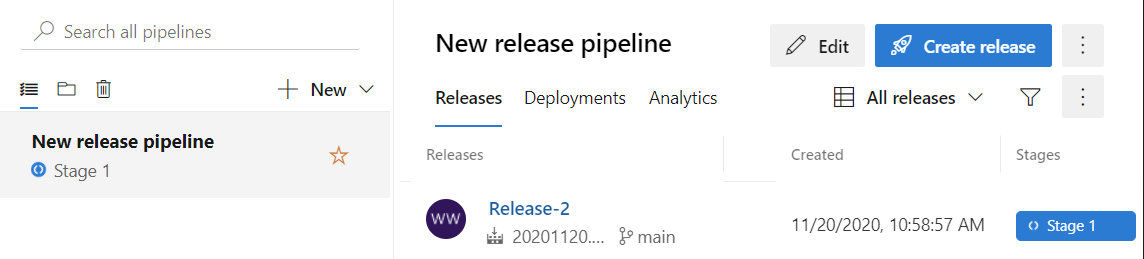
Verify the release by browsing to your Azure Web App.
Summary
From now on whenever you push your code to the main branch, your code will build, optionally run tests, and publish the resulting application as a zip file. After that it will automatically start releasing your code to the configured Azure Web Apps. This is just a starter setup of your build and release pipelines and you can and should modify them after your needs and requirements.