Hey, I’m back. Long time since I did some writing on this blog. But I needed to get this one out. As you all know I’m a huge fan of the Microsoft Teams extensibility model and now with the SSO support for Tabs, it’s even easier to create integrated experiences for your end users where they can consume data and information from the Microsoft Graph or LOB systems.
I recently did a small appearance at the Microsoft 365 PnP webcast showcasing how to configure and scaffold a Microsoft Teams project that uses this new SSO Tab feature. You can watch the recording here:
I’ve also documented the whole process at the Microsoft Teams Yeoman generator wiki.
One thing I did not show in that video or in the tutorial is how to access other services. The Tab SSO feature (microsoftTeams.authentication.getAuthToken) in Microsoft Teams gives you a token, but this is just an identity token that cannot be used as an access token to call into the Microsoft Graph - despite we grant permissions on the Tab app in the tutorial.
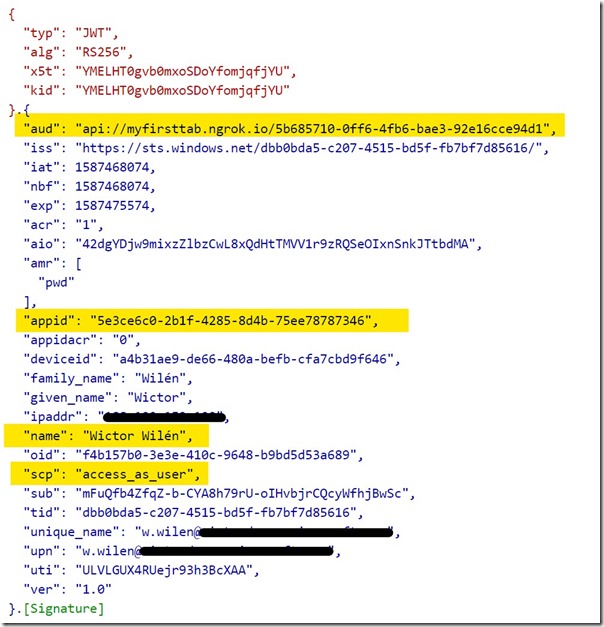
If we inspect the token we get from Microsoft Teams, using https://jwt.ms, we see the following:

Let’s focus on the highlights. aud is the intended audience of the token and in this case it’s the Application ID URI of my Tab, as defined in the tutorial. appid is the application id of issuing application - in this case the Microsoft Teams web application. You also see the name of the user to whom the token was issues - and that’s what we use when typing out our text in the Tab, and finally we do have the scp/scope we created.
As I said, we cannot use this token to talk to Microsoft Graph or any other services. But how do we do that?
Exchanging the token using an on-behalf-of flow
In order to be able to call into Microsoft Graph we need to use the token we have, that ensures our identity and use some server side code to do an OAuth 2.0 on-behalf-of flow. This means that we take the token we received from Microsoft Teams and send to a service, that accepts the aud claim and then uses this token to exchange that for another token for a set of specified scopes using a client secret. We can then use this newly generated token to call into the services, allowed by the app registration and scopes.
To show you how this is done, I’ll use the exact same demo as shown in the linked tutorial from the Yo Teams wiki. Note that this demo is in node.js, using npm packages - but the process is the same for all platforms.
Preparing the Azure AD Application
Before we start writing any code let’s go to our Azure AD application and do two things;
- First we need to create a client secret which will be used during the on-behalf-of flow (Certificates & Secrets > New Client secret). Store the newly created secret in a secure location
- Secondly we will do an admin consent of the permissions grants ( API Permissions > Grant admin consent for ). In a production scenario you might want to manage this in your application/tab instead and redirect the users/admins to a consent page.
Since we’re only going to read the user photo from the user in this demo, there’s no need to add additional scopes as we already have added User.Read.
Building a custom web service for the on-behalf-of-flow
In my application I will use the passport and passport-azure-ad modules to secure my endpoints and we need to install those modules. We also need the axios and querystring modules for our demo.
npm install passport passport-azure-ad --save
npm install @types/passport @types/passport-azure-ad --save-dev
npm install axios querystring --save
Once we have this we can define a new Express router that will expose a web api that will accept the identity token, use the token and convert it to an access token that can be used by Microsoft Graph and then finally call into the Graph and return the results.
You will find all the code in this repo and I’ll only repeat some of the code in this post: https://github.com/wictorwilen/teams-sso-tab-demo
The web API
Under the ./src/app folder I create a new folder called api in which I create a new file called graphRouter.ts. This file exposes one single api (GET /photo). The router itself is also added to server.ts so it is properly loaded by Express.
 router.get(
  "/photo",
  pass.authenticate("oauth-bearer", { session: false }),
  async (req: express.Request, res: express.Response, next: express.NextFunction) => {
    ...
});
As you can see this request is passed through a passport Express handler. This handler is configured further up in the file. A BearerStrategy is configured to only accept incoming authorization tokens that has the correct client id and audience (the client id and application id URI for my Tab) - any other tokens will be denied. The handler will also decode the token and add the tenant id, user name and upn to the request object for our convenience.
In order to exchange this identity token for an access token that gives us access to the Microsoft Graph we use a helper method in the router method.
const accessToken = await exchangeForToken(user.tid,
  req.header("Authorization")!.replace("Bearer ", "") as string,
  "https://graph.microsoft.com/user.read"]);
The helper method uses the tenant id, the incoming token as well as an array of scopes to exchange that for a new access token. The helper method itself uses this information together with the client id and the client secret we created to request a new token. You can see the full method on Github. Essentially it uses this together with a specific grant_type and request_token_use=on_behalf_of parameters to request the token from a Microsoft Azure AD OAuth v2 endpoint.
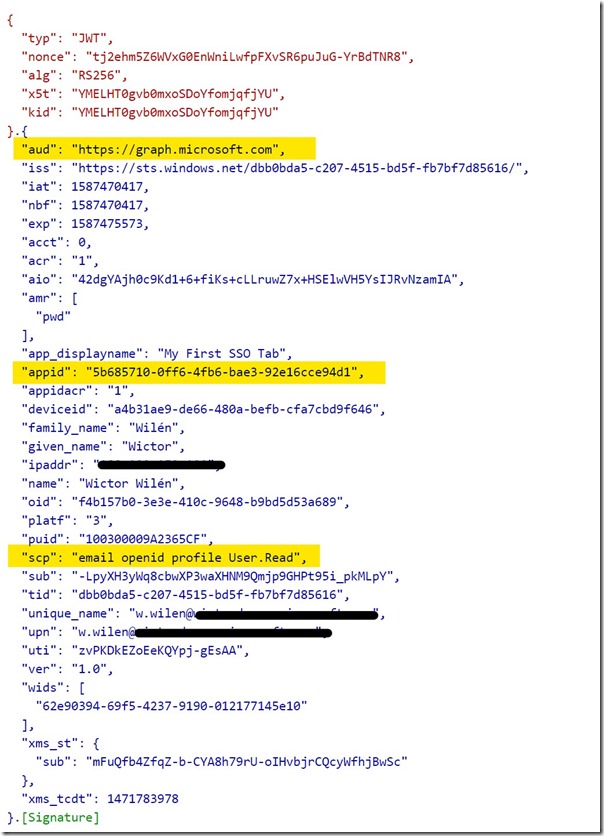
The token we receive back should look like below, where you can see that the aud now indicates Microsoft Graph and that we do have the required scopes to read the user photo.
Now all that is left is to fire away the query to the correct Microsoft Graph endpoint and use the access token we received from the helper method.
The Tab should now be able to use this client side and retrieve the photo of the user from Microsoft Graph, without the need of signing in on all platforms (desktop, mobile and web).
You can see the the API call here and the React implementation here.
Good luck have fun!

