
When building applications for Microsoft Teams, the very first hurdle essentially all developers will try to jump over is the one with getting an access token to be able to communicate with Microsoft Graph. This is something that can be done fairly easy, if you know what to do, but requires you as a developer to connect a few dots. Over the last year this has become way easier, and there are a few great examples out there - you can find some great ones in the PnP Teams Samples.
Most of the options starts with that you need to configure your Teams Tab for Single-Sign-On. Using this approach you get a native experience across the different Teams apps (browser, desktop & mobile) but you will have a token that only identifies you. This token cannot directly be used to call into Microsoft Graph. In order to be able to use the Graph JavaScript SDK you need to exchange that token to an access token with the correct scopes etc. I’ve written about this exchange (on-behalf-of flow) before at Microsoft Teams Tabs SSO and Microsoft Graph - the ‘on-behalf-of’ blog post. It’s not that hard, but requires some plumbing, and personally I’m bored at writing that stuff over and over again.
Also, together with the new Microsoft Teams Toolkit there’s a new client-side npm package called @microsoft/teamsfx that makes the client side of talking to Microsoft Graph - with a correct token - a bliss. This package is using an standardized approach that is called simple auth to exchange the token provided by the SSO Tab into an access token accepted by Microsoft Graph. The exchange has to happen server side and the Teams Toolkit team provides an ASP.NET Core implementation of that.
But, what if you’re using node.js and/or the Teams Yeoman generator (yo teams)? Then, this is your lucky day. I just published a new npm package called teams-simpleauth that is an Express router that does the server side/on-behalf-of exchange for you with just a few lines of code.
How to use Simple Auth with a Yo Teams scaffolded project
So, let’s see how easy this is to set up! First of all we need a scaffolded Yo Teams project, with an Azure AD SSO Tab. With that you also need to set up the Azure AD application to get the SSO to work.
However, we need to do some configuration to that Azure AD application. Since our intent is to exchange the token, recieved from Teams, into a token that we can access Microsoft Graph with we need to add the required scope for this token. In this demo we’ll be using the presence status of the user, which requires us to ad the Presence.Read scope. And, since this exchange is done server side, we need to pre-consent the permissions by granting admin consent for the tenant. You do all this in the Azure AD portal on the app registration under API Permissions. You also need to create a secret for the Azure AD app (under Certificates & Secrets in the AAD portal). For this demo you should save the secret value as a new environment variable in the .env file with the name TAB_APP_SECRET.
Configure the simpleauth router
Next is to add the teams-simpleauth npm package by running:
npm install teams-simpleauth --save
To configure the simpleauth endpoint we have to make a few additions to the ./src/server/server.ts file - according to the teams-simpleauth documentation. We start with importing the router and the following to the top of the file:
import { SimpleAuthRouter } from "teams-simpleauth";
Next we need to add the following router configuration to the Express application, you can do this essentially anywhere in the file (based on your preference and priority of routers). Replace the tenantId with the id of the tenant you are using, or just use common if you want the option to serve any tenant.
express.use("/auth/token", simpleAuthRouter({
    appId: process.env.TAB_APP_ID as string,
    appIdUri: process.env.TAB_APP_URI as string,
    appSecret: process.env.TAB_APP_SECRET as string,
    scopes: ["Presence.Read"],
    tenantId: "00000000-0000-0000-0000-000000000000"
}));
Our server side implementation is now done and we can move on to build our logic on the client side.
Use TeamsFx to exchange the token and call Microsoft Graph
The client side of the Tab uses @microsoft/teamsfx utility to handle the exchange of token and to retrieve a Microsoft Graph client. Install the package with the following:
npm install @microsoft/teamsfx --save
In your React client side Tab implementation, start by importing the TeamsFx utility:
import * as teamsFx from "@microsoft/teamsfx";
Then add a new state value to the class like this:
const [presence, setPresence] = useState<string>("Unknown");
And modify the output of the React component so that it shows the current presence status:
<Text content={`Hello ${name}, your presence is ${presence}`} />
The TeamsFx utility should be used after the application successfully authenticated (that is in the successCallback of the getAuthToken method) and should look something like this:
teamsFx.loadConfiguration({
    authentication: {
        initiateLoginEndpoint: `https://${process.env.PUBLIC_HOSTNAME}/ile`,
        clientId: process.env.TAB_APP_ID,
        tenantId: (decoded as any).tid,
        authorityHost: "https://login.microsoftonline.com",
        applicationIdUri: process.env.TAB_APP_URI,
        simpleAuthEndpoint: `https://${process.env.PUBLIC_HOSTNAME}`
    }
});
const credential = new teamsFx.TeamsUserCredential();
const graphClient = teamsFx.createMicrosoftGraphClient(credential, ["Presence.Read"]);
const result = await graphClient.api("/me/presence").get();
setPresence(" is " + result.availability);
The loadConfiguration configures the TeamsFx utilty to use the simple auth router with the correct Azure AD app. After that we create a new credential object, which is passed into the TeamsFx utility to retrieve the Microsoft Graph Client. And finally we use that Graph client to call into Microsoft Graph to get the data we need.
NOTE: If you get an error/warning about missing polyfills add a resolve fallback for
cryptoset to false in thewebpack.config.jsfile for the second (client) configuration. See full example for details.
Build and run your app (using gulp ngrok-serve --debug or similar), upload the application to your Microsoft Teams local app store and then add the Tab to a Team (for configurable tabs) or install the app for you (for static tabs).
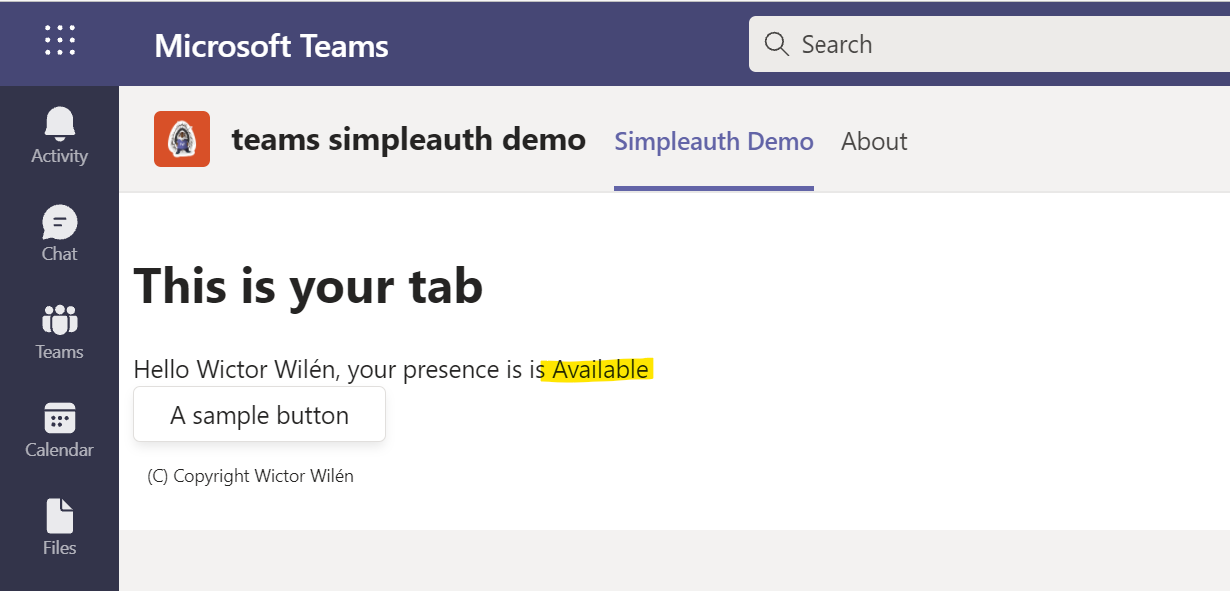
When you open the Tab you will after a second see your name, and then after an additional second your current presence will be shown, as below:
Summary
As you see, the single sign on experience for Microsoft Teams tabs has come a long way and we now have plenty of great tools and utilities to make this experience easy and secure. With just a few lines of code/configuration you have access to the full power of Microsoft Graph. Good luck!
The full demo of this is available at https://github.com/wictorwilen/teams-simpleauth-demo.